
Browse the illustrated guidance
Open only the topic you need. The sections below cover the principal installation issues without repeating the shorter overview guide.
Axial fans
Protect the full fan area from uneven, turbulent or restricted airflow.
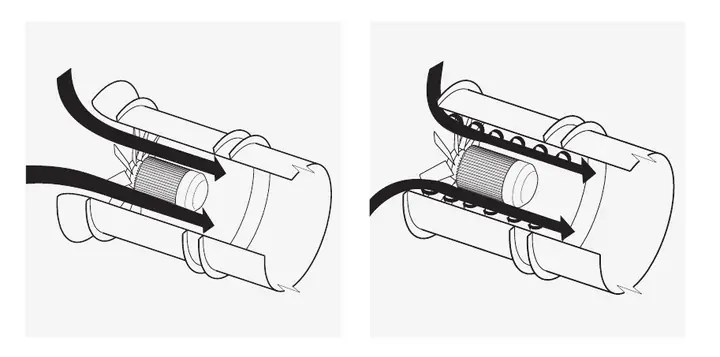
Free-air inlets and inlet cones
Do
- Fit the correct inlet cone to an open axial fan intake.
- Keep nearby walls and obstructions at least one fan diameter away where practicable.
- Fit a suitable guard without unnecessarily restricting free area.
Avoid
- An abrupt, unformed entry into the impeller.
- Leaving an open rotating fan inlet unguarded.
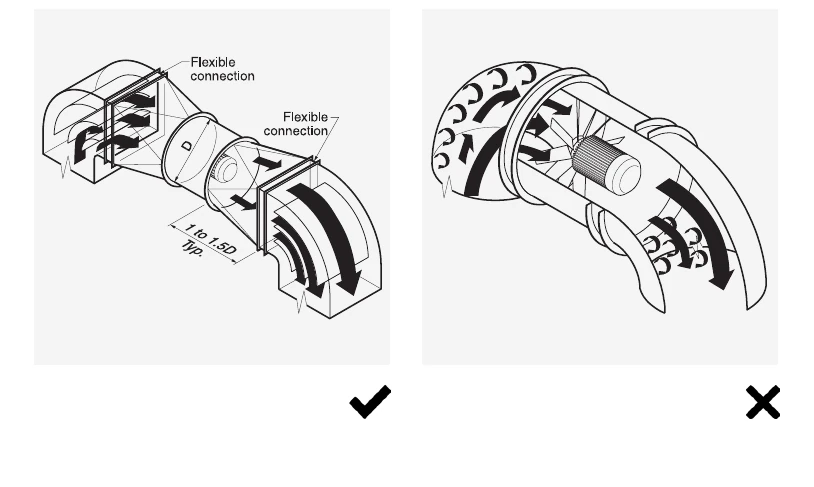
Sharp bends and turning vanes
Do
- Provide straight duct before and after the fan wherever practical.
- Fit turning vanes when a sharp bend cannot be moved farther away.
- Keep airflow even across the full fan opening.
Avoid
- Placing an unvaned elbow directly at the fan.
- Allowing one side of the impeller to receive most of the airflow.
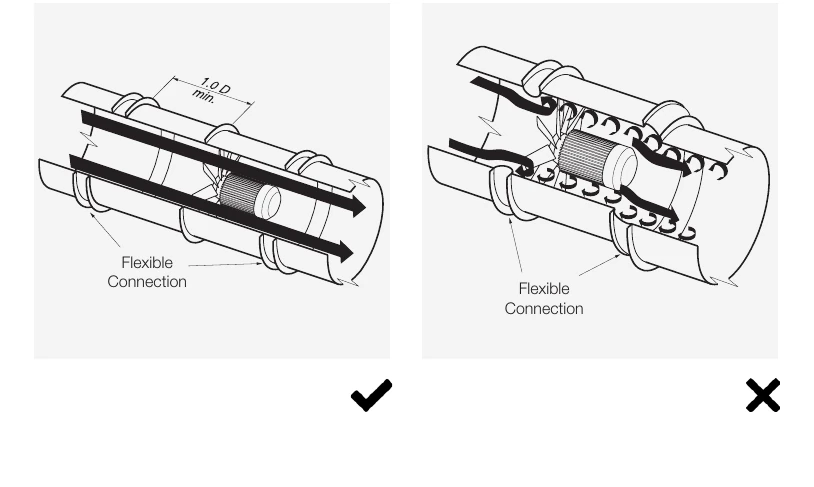
Flexible connections
Do
- Install connectors taut, aligned and without folds.
- Support adjoining ductwork independently.
- Use the connector to isolate vibration, not to correct alignment.
Avoid
- Slack material being drawn into the airway.
- A connector that narrows the effective duct area.
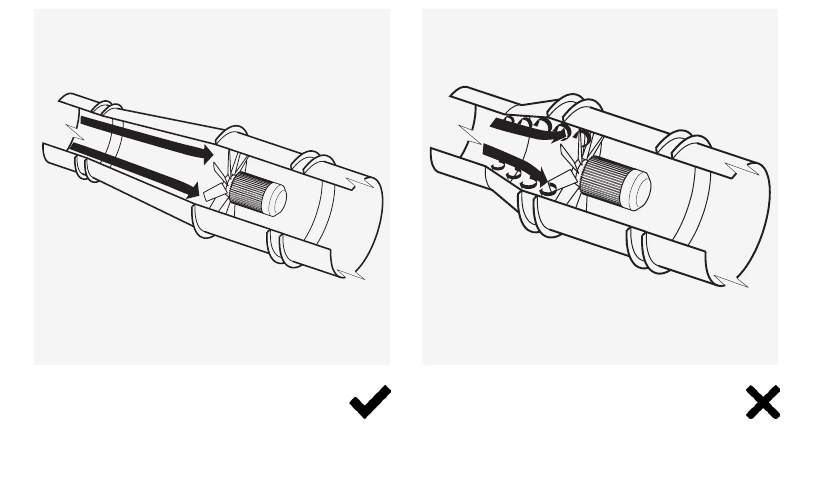
Transitions and outlet obstructions
Do
- Use gradual, symmetrical transitions with an included angle around 15 degrees or less where practical.
- Allow outlet clearance and recover velocity pressure with a properly designed diffuser.
Avoid
- Abrupt area changes next to the fan.
- Walls, dampers or fittings immediately across the discharge.
Centrifugal fans
Preserve the direction and distribution of air entering and leaving the impeller.
Discharge bends and wheel rotation
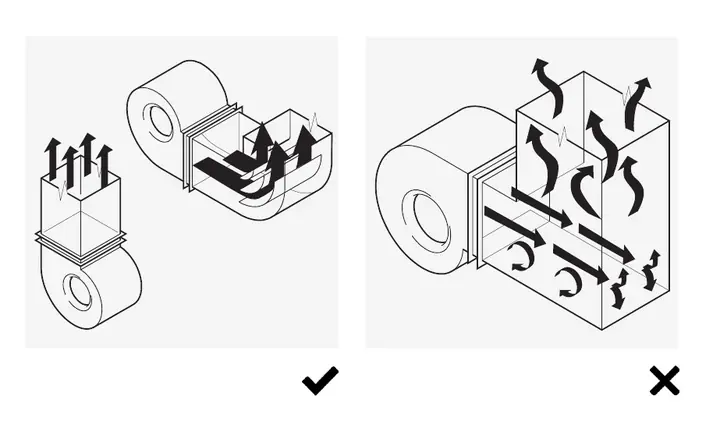
Do
- Use radiused bends and splitters.
- When a bend must be close, orient it in the direction of wheel rotation.
- Use a gradual discharge transition for pressure recovery.
Avoid
- Turning sharply against the wheel rotation.
- An abrupt elbow directly on the discharge.
Inlet boxes and even airflow
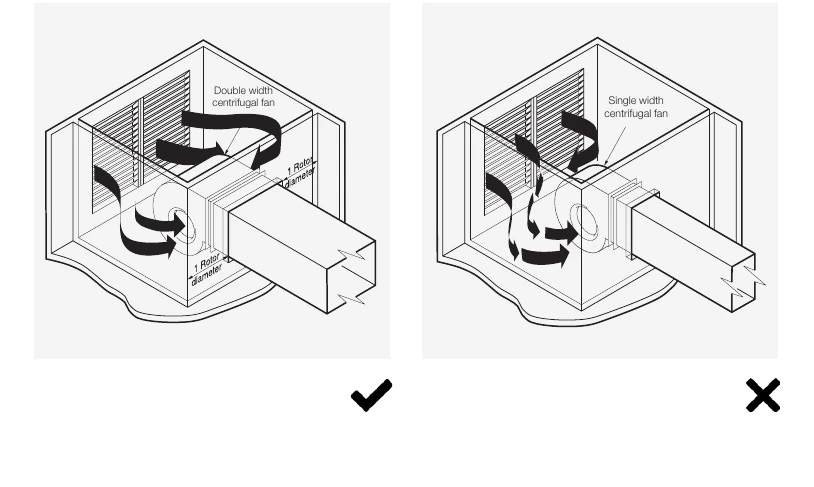
Do
- Size inlet boxes generously.
- Use splitters or turning vanes to prevent spinning flow.
- Distribute air evenly across the whole inlet.
Avoid
- Undersized inlet plenums.
- A high-velocity jet directed at only one side of the inlet.
Roof fans
Control air leakage, weather exposure and the movement of gravity shutters.
Curb seals and mounting angle
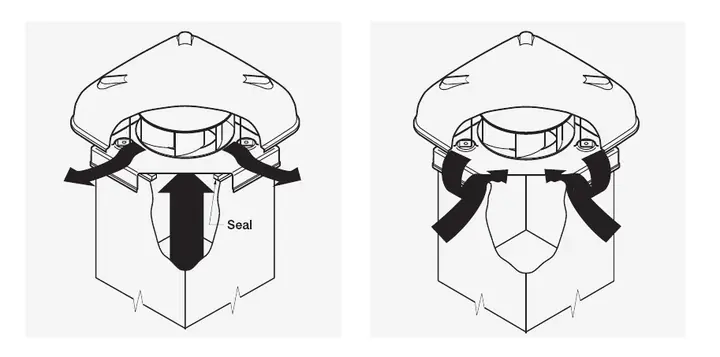
Do
- Seal the complete perimeter between fan base and upstand.
- Keep the base level or within the manufacturer’s stated angle.
- Check the weathering detail remains continuous.
Avoid
- Gaps that allow outside air to short-circuit the extract.
- Assuming every roof fan tolerates the same roof pitch.
Back-draft shutters and prevailing wind
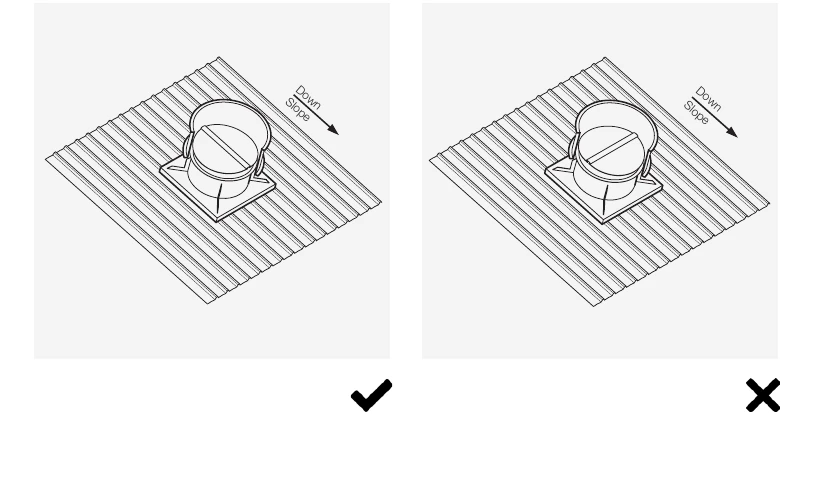
Do
- Orient gravity shutters so each leaf experiences the same gravitational effect.
- Position the unit to minimise prevailing-wind back pressure.
Avoid
- Setting shutters at an unsuitable angle to the roof fall.
- Locating the discharge where recirculation is likely.
Noise control and attenuators
Allow airflow to settle before it meets acoustic splitters, grilles and sensitive spaces.
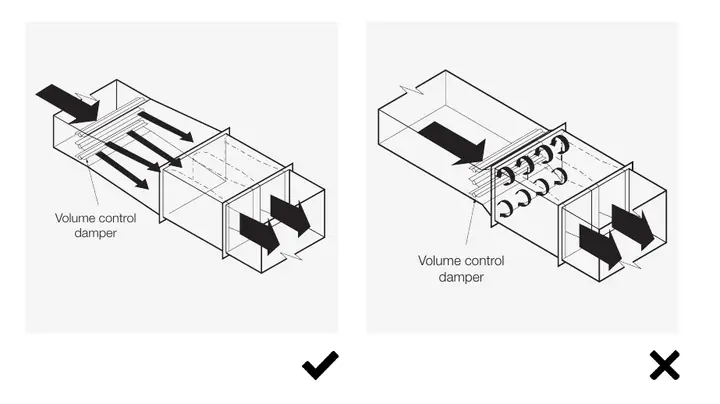
Transitions, dampers and attenuators
Do
- Use gradual symmetrical transitions.
- Provide a settling length between dampers, fittings and attenuators.
- Check airflow-generated noise as well as insertion loss.
Avoid
- A damper or abrupt transition immediately at the attenuator face.
- Selecting a high-attenuation silencer without checking its free area.
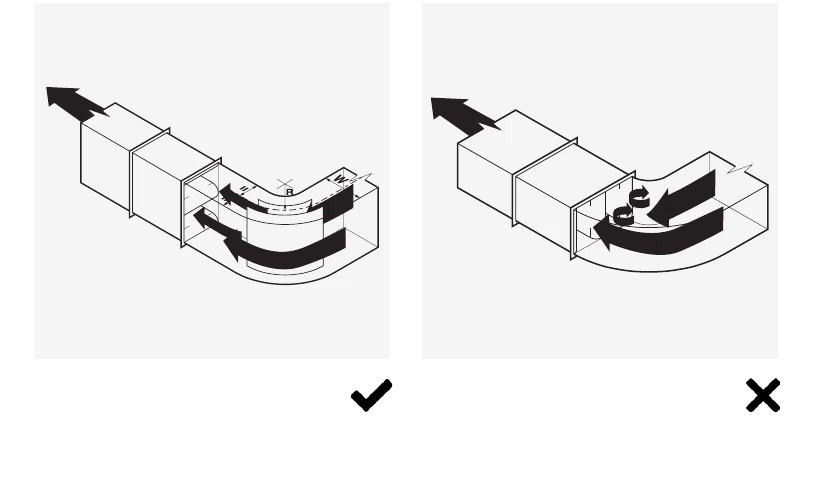
Bends and splitter orientation
Do
- Align attenuator splitters with the plane of a nearby bend.
- Use turning vanes or a generous-radius bend.
- Provide adequate distance between the fan and attenuator.
Avoid
- Using attenuator splitters as turning vanes.
- Placing a rectangular attenuator hard against a fan discharge.
Louvres, walls and noise-sensitive rooms
Do
- Keep grille velocities moderate by using sufficient free area.
- Use spacers where louvres and silencers would otherwise be directly adjacent.
- Place acoustic treatment so noise cannot bypass it through the building structure.
Avoid
- A silencer directly against a louvre.
- Positioning a noisy fan directly above a noise-sensitive space without treatment.
Vibration isolation
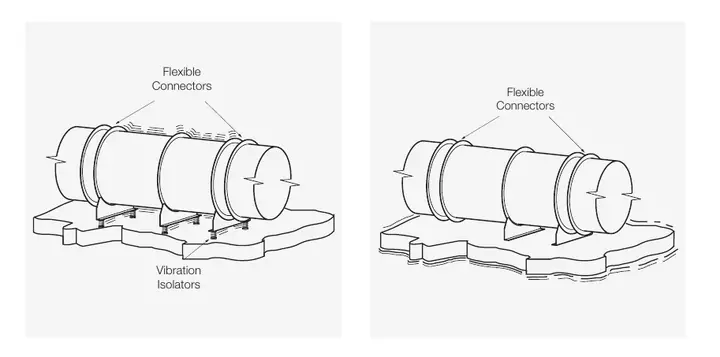
Isolate the fan without creating rigid paths around the selected mounts.
Fan and duct isolation
Do
- Select isolators for the supported weight and operating speed.
- Use flexible connections and independently supported ductwork.
- Confirm mounts are level and free to move after commissioning.
Avoid
- Bolting the fan directly to the structure.
- Rigid duct, conduit or restraint bypassing the isolators.
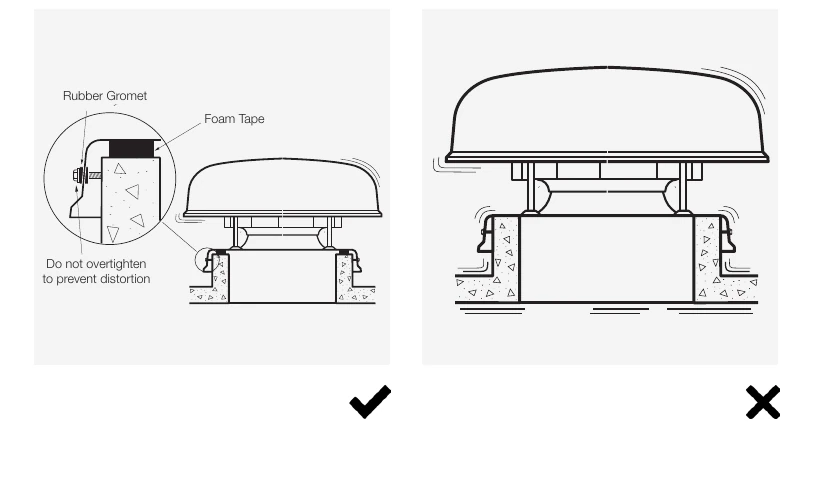
Roof-fan isolation details
Do
- Use suitable foam tape, rubber grommets or specified isolators.
- Tighten fixings only enough to secure the unit without crushing isolation materials.
Avoid
- Over-tightening fasteners.
- Allowing weathering or metalwork to form a rigid bridge.
System layout and fan selection
Choose the fan and arrange the system as one complete airflow path.
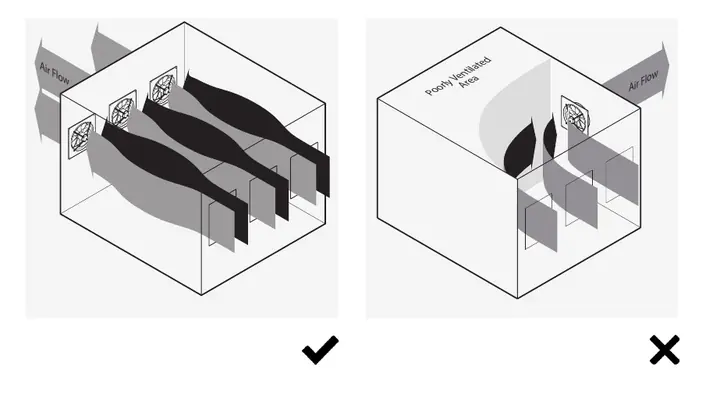
Room airflow and dead zones
Do
- Position supply and extract points to sweep the occupied space.
- Centralise equipment where it improves even flow through coils or plenums.
Avoid
- Short-circuiting supply air straight to the extract.
- Leaving part of the room with little or no air movement.
Match the fan type to the system
Do
- Confirm design airflow, external resistance, temperature and noise limits.
- Allow for filters, dampers, grilles and dirty-system resistance.
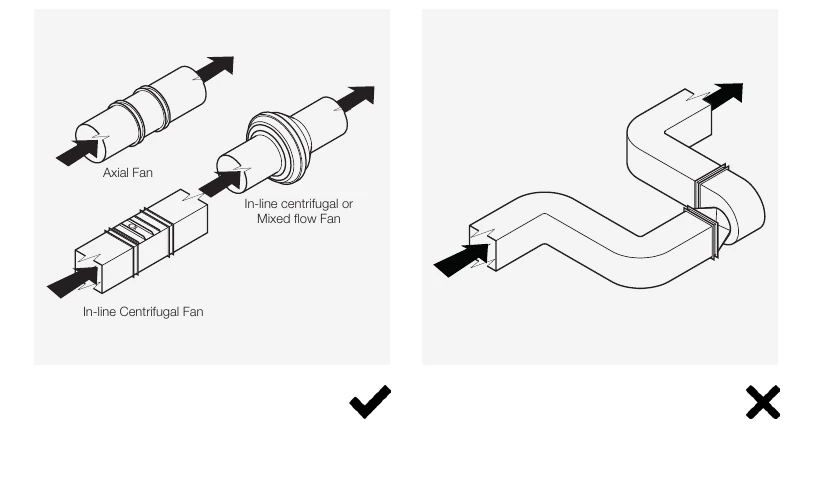
- Choose axial, mixed-flow or centrifugal performance to suit the duty and available space.
Avoid
- Selecting by duct diameter alone.
- Assuming a free-air airflow figure will be achieved after connection to ductwork.
Before commissioning: verify rotation, airflow direction, electrical current, controls, damper position, guards, vibration, flexible connections and safe maintenance access. Measure system performance where the project requires it.